看这篇文章之前建议先看一下之前的文章:《音频频谱动画的原理与实现(一)》
加权
对人类听觉来说,愈高的声压或声强,会造成愈大的听觉感知。需要根据等响曲线对频率幅值进行加权,这里使用上文提到的A加权方式。初始化加权数组:
1
2
3
4
5
6
7
8
9
10
11
12
13
14
15
16
17
18
19
20
21
22
23
24
25
26
27
28
|
- (void)initWeightings {
float Δf = 1.0 * _sampleRate / _fftSize;
int length = _fftSize;
if (_loudnessWeights != NULL) {
free(_loudnessWeights);
}
float value = 1;
_loudnessWeights = (Float32 *)malloc(length * sizeof(Float32));
vDSP_vfill(&value, _loudnessWeights, 1, length);
float c1 = powf(12194, 2.0);
float c2 = powf(20.6, 2.0);
float c3 = powf(107.7, 2.0);
float c4 = powf(737.9, 2.0);
for (int i = 0; i < length; i++) {
float f = powf(Δf * i, 2);
float num = c1 * powf(f, 2);
float den = (f + c2) * sqrtf((f + c3) * (f + c4)) * (f + c1);
float Raf = num / den;
float weights = 1.2589 * Raf;
_loudnessWeights[i] = weights;
}
}
|
对FFT结果进行加权
1
2
3
| int length = _fftSize / 2;
vDSP_vmul(_amplitudes, 1, _loudnessWeights, 1, _weightsAmplitudes, 1, length);
|
相比之前的实现没有特别大的区别,这是因为我们对时域信号进行FFT得到的512个频率点进行了直接的展示,表示出录音数据在每个频率点的振幅,对用户而言,是不需要对频域进行如此高精度展示的。
所以我们需要对频率进行精度划分,也就是频带划分。
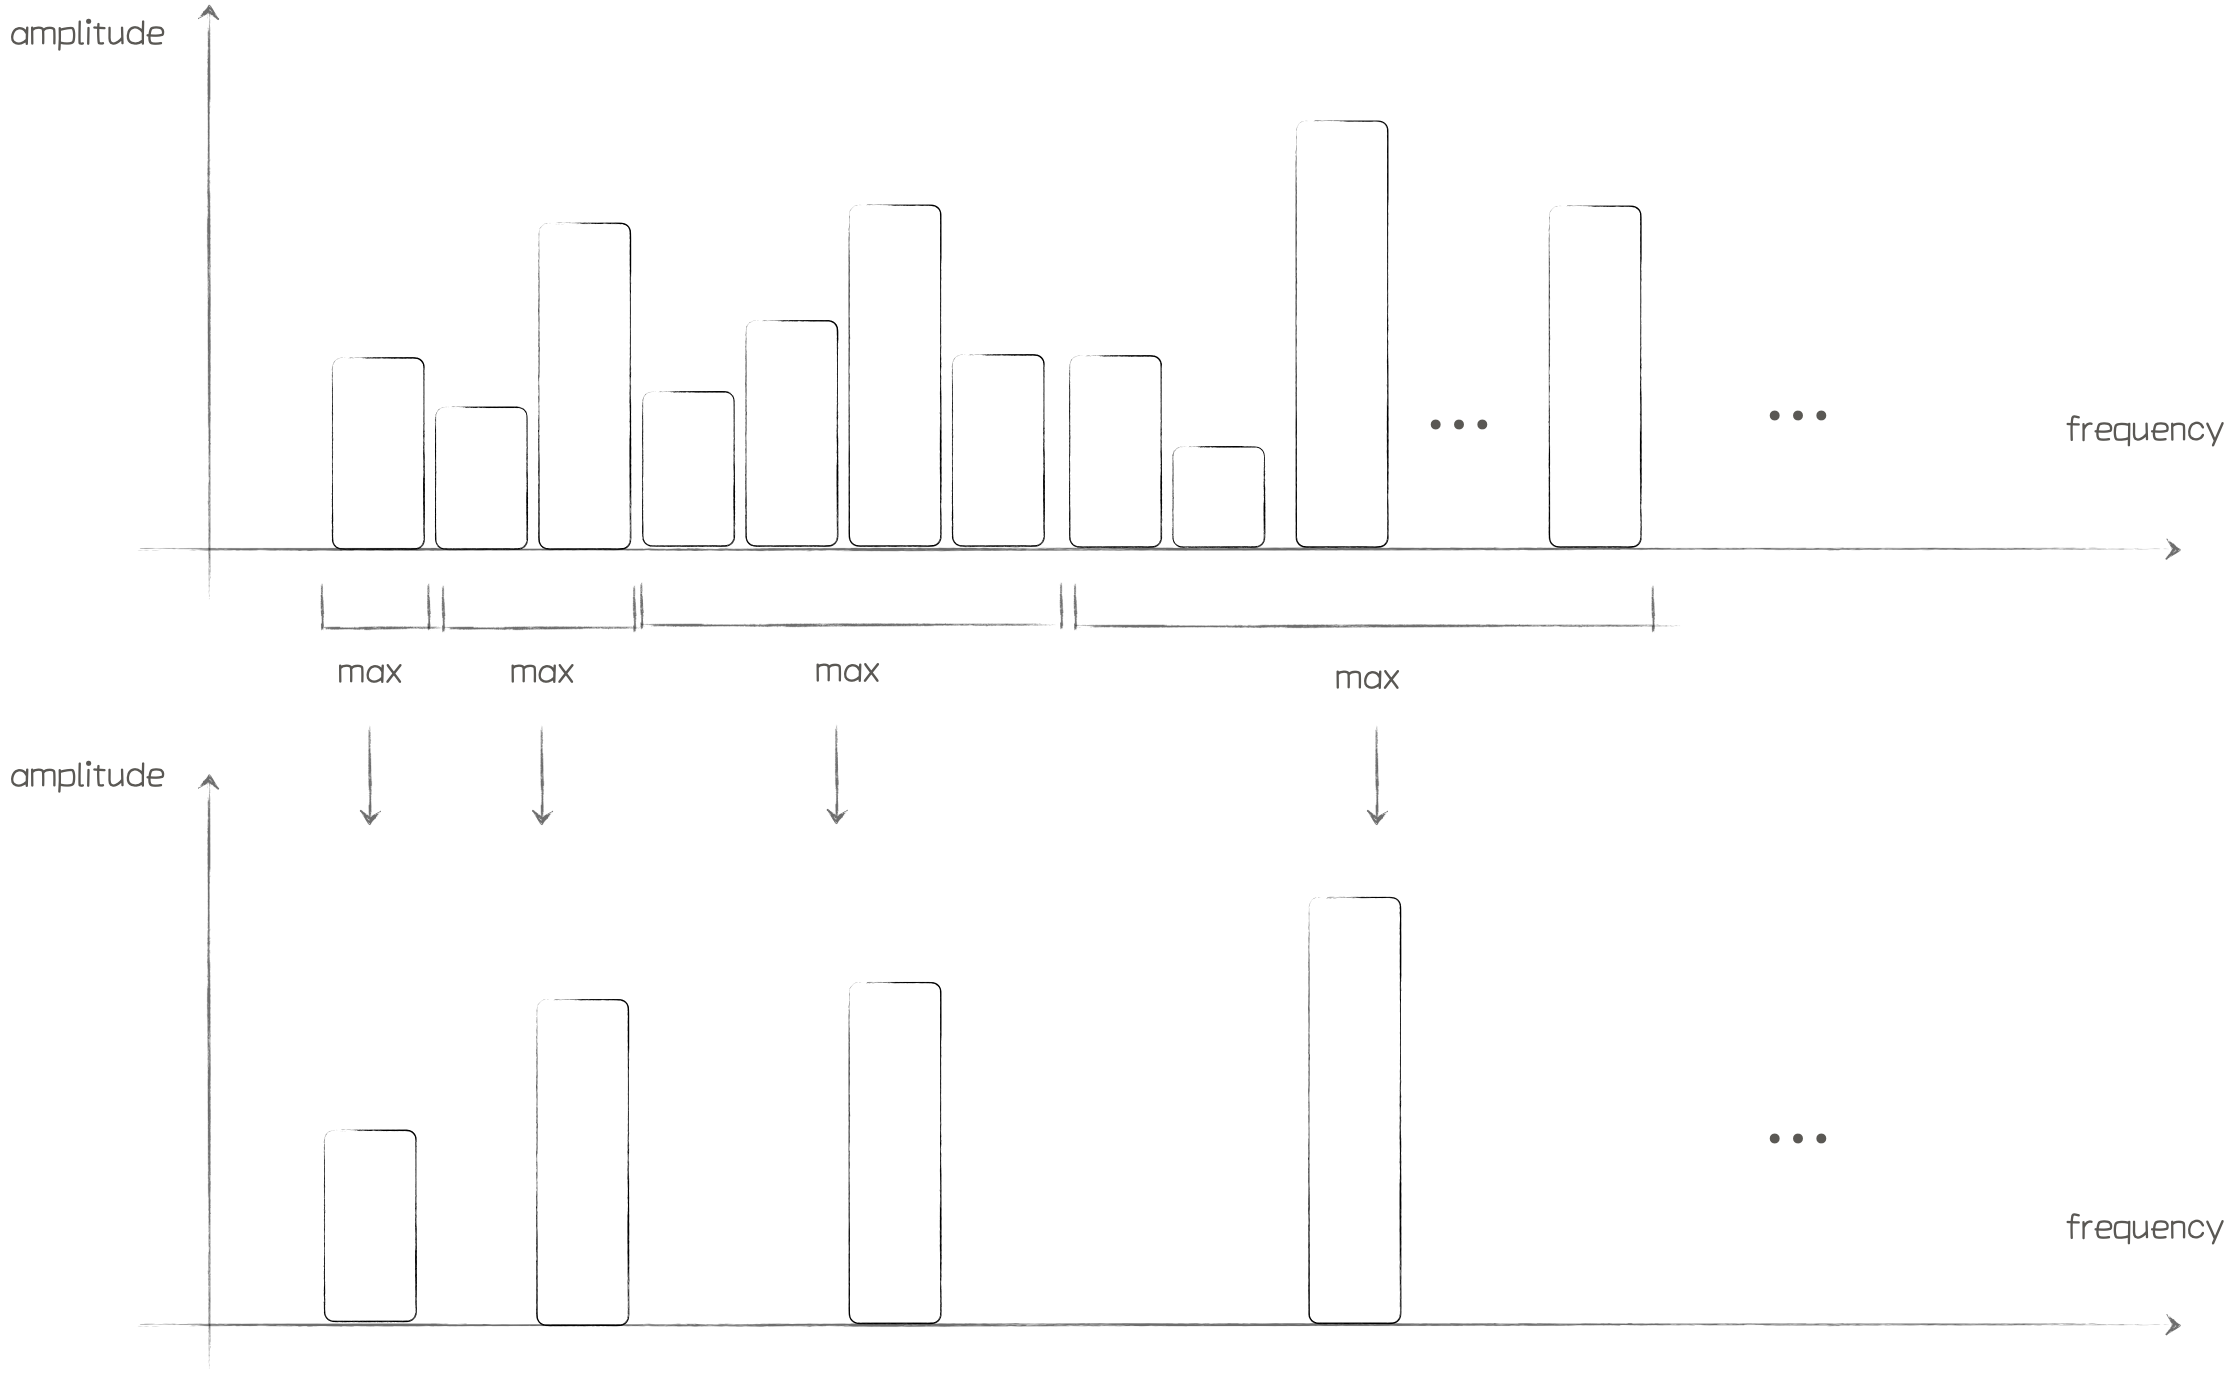
频带划分
人耳可以听到20 - 20KHZ的音频信号,但对3000Hz左右的声音较为敏感,人耳可以很轻松的分别出低频声音的音调变化,但是对高频声音的变化并不敏感。所以可以说频率和音调之间的变化并不是呈线性关系,而是某种对数的关系。因此在实现动画时将数据从等频率间隔划分成对数增长的间隔更合乎人类的听感。频带划分示意图:
频带划分实现代码
1
2
3
4
5
6
7
8
9
10
11
12
13
14
15
16
17
18
19
20
21
22
23
24
25
26
27
| - (void)updateFrequencyBandsCount:(UInt32)bandsCount {
if (_arrFrequencyBands.count == bandsCount) {
return;
}
float n = log2f(_maxFrequency / _minFrequency) / bandsCount;
float lowerFrequency = _minFrequency;
float upperFrequency = _minFrequency;
float bandWidth = 1.0 * _sampleRate / _fftSize;
NSMutableArray *arrFrequencyBands = [NSMutableArray array];
for (int i = 0; i < bandsCount; i++) {
upperFrequency = lowerFrequency * powf(2, n);
if (i == bandsCount - 1) {
upperFrequency = _maxFrequency;
}
AudioBandsInfo *brandInfo = [AudioBandsInfo createWith:lowerFrequency upperFrequency:upperFrequency bandWidth:bandWidth];
[arrFrequencyBands addObject:brandInfo];
lowerFrequency = upperFrequency;
}
_bandsCount = bandsCount;
_arrFrequencyBands = arrFrequencyBands;
}
|
这里我使用的_minFrequency的值为60,_maxFrequency的值为9000
1
2
3
4
5
6
7
8
| Float32 *spectrum = (Float32 *)malloc(_bandsCount * sizeof(Float32));
for (int i = 0; i < _bandsCount; i++) {
AudioBandsInfo *brandInfo = [_arrFrequencyBands objectAtIndex:i];
float maxAmplitude = [brandInfo getMaxAmplitude:_weightsAmplitudes length:length];
float result = maxAmplitude * _amplitudeLevel;
spectrum[i] = result;
}
|
效果如下
闪动优化
目前看动画效果由于每帧之间的数据差异较大,导致前后两帧的画面闪动的感觉较为明显,所以我们可以将上一帧的值缓存起来,然后跟当前帧的值进行加权平均,使得前后两帧的变化更为平滑。
1
2
3
4
5
6
7
8
9
10
11
| - (void)smoothVerticalSpectrum:(float *)spectrum length:(int)length {
if (_spectrum == NULL) {
return;
}
for (int i = 0; i < length; i++) {
float oldVal = _spectrum[i];
float newVal = spectrum[i];
spectrum[i] = oldVal * kSmoothingTimeConstant + newVal * (1.0 - kSmoothingTimeConstant);
}
}
|
锯齿消除
上面的效果频带之间的高低变化过大,导致锯齿感较强,这里也可以使用加权平均的方式进行优化
1
2
3
4
5
6
7
8
9
10
11
12
13
14
15
16
17
18
19
20
21
22
| // 使用加权平均解决锯齿过多
- (void)smoothHorizontalSpectrum:(float *)spectrum length:(int)length {
int count = 3;
float weights[] = { 1, 4, 1 };
float totalWeights = 0;
for (int i = 0; i < count; i++) {
totalWeights += weights[i];
}
int startIndex = count / 2;
for (int i = startIndex; i < length - count; i++) {
float total = 0;
for (int j = 0; j < count; j++) {
total += spectrum[i + j] * weights[j];
}
float averaged = total / totalWeights;
spectrum[i] = averaged;
}
}
|
本文参考
https://en.wikipedia.org/wiki/A-weighting
一步一步教你实现iOS音频频谱动画(一)https://juejin.cn/post/6844903784011792391
一步一步教你实现iOS音频频谱动画(二)https://juejin.cn/post/6844903791670591495